4-WEEK PROGRAM TO INCREASE YOUR VERTICAL JUMP
BUILD AN EXPLOSIVE LOWER BODY WITH COMPEX MUSCLE STIMULATOR
This is not your typical workout. Our workout to help you increase your vertical jump is paired with our Compex muscle stimulator, which will enable you to activate your muscle fibers. New to muscle stim? Explore our "What is Muscle Stimulation?" section.
HOW THE PLAN WORKS
This is a 4 week step-by-step Compex training plan designed to help you hit the Type II muscle fibers in your legs that will help you explode and increase your vertical jump. These exercises can be done as standalone or as an accompaniment to your current training workout to improve your vertical jump and jump higher. It is important to target the muscle groups associated with jumping. Focus strengthening your quads, calves, hamstrings and glutes. You can work through this regimen at home or at the gym.
Before you start this program, it is important that you know a little about Compex technology and how it is working to make you stronger, more balanced and more efficient in your physical abilities.
Note: Due to the fact that the technology allows it to trigger your targeted muscle fibers, it is very likely that you will experience DOMS (Delayed Onset Muscle Soreness). This is completely normal as you are going to be using muscle tissue that you have not been able to use previously. Drink plenty of water and refer to our recovery programs to help you through this adjustment.x
The way to achieve the best results with this program is to log your levels each time you do it.
Increasing Your Vertical Benefits These Sports
- Basketball |
- Football |
- Running |
- Soccer
Let's Get Started
4-Week Workout Schedule for Your Best Vertical Jump
| Day 1 | Day 2 | Day 3 | Day 4 | Day 5 | Day 6 | Day 7 | |
|---|---|---|---|---|---|---|---|
| Week 1
Week 1
|
Warm Up Static Quads Static Calves Static Hamstring Active Recovery |
Abs Glutes |
Warm Up Static Quads Active Recovery |
Abs Glutes |
Warm Up Static Quads Static Calves Static Hamstring Active Recovery |
Abs Glutes |
Rest Day |
| Week 2
Week 2
|
Warm Up Static Quads Static Calves Static Hamstring Active Recovery |
Abs Glutes |
Warm Up Static Quads Static Calves Active Recovery |
Abs Glutes |
Warm Up Static Quads Static Hamstring Active Recovery |
Abs Glutes |
Rest Day |
| Week 3
Week 3
|
Warm Up Dynamic Quads Dynamic Calves Static Hamstring Active Recovery |
Abs Glutes |
Warm Up Dynamic Quads Dynamic Calves Static Hamstring Active Recovery |
Abs Glutes |
Warm Up Dynamic Quads Dynamic Calves Static Hamstring Active Recovery |
Abs Glutes |
Rest Day |
| Week 4
Week 4
|
Warm Up Dynamic Quads Dynamic Calves Static Hamstring Active Recovery |
Abs Glutes |
Warm Up Dynamic Quads Dynamic Calves Static Hamstring Active Recovery |
Abs Glutes |
Warm Up Dynamic Quads Dynamic Calves Static Hamstring Active Recovery |
Abs Glutes |
Rest Day |
DYNAMIC WARM UP
This is to be done without the Compex Device attached (5-7 min). You will do 3 sets of the following plyometric exercises as quickly and explosively as possible.
WARM UP
Set 1: 15 Air squats, 20 Lunges, 10 Step ups (each leg), 10 kicks (each leg)
Set 2: 15 Air squats, 20 Lunges, 10 Step ups (each leg), 10 kicks (each leg)
Set 3: 15 Air squats, 20 Lunges, 10 Step ups (each leg), 10 kicks (each leg)
Warm Up Exercise 1: Air Squats – Complete 15 Air squats as quickly as possible. Work to get below parallel when down and get to hip extension when up.
Warm Up Exercise 2: Lunges – Complete 20 Lunges. Make sure your back knee doesn’t hit the ground. Opposite arm will be in a 90 degree position. Drive through the front leg and immediately into the next lunge making sure your front knee does not extend over your toe.
Warm Up Exercise 3: Step Ups – Complete 10 Steps up on each leg. Keeping one foot on a bench Drive the other leg up from the floor firing the knee as hard as possible. Make this as explosive and as fast as you can.
Warm Up Exercise 4: High Kicks – Complete 10 High kick with each leg. The kick should be forward and you are looking to get a snap with your foot. The goal is to stretch and activate your hamstrings. If you are new to this exercise take your time.
COMPEX Static Training
Weeks 1-2: For the initial weeks of using your device it is important to get a feel for the programs and the contractions that occur. COMPEX is a powerful technology so we recommend being seated for the initial training sessions until you get a sense of COMPEX and NMES Technology
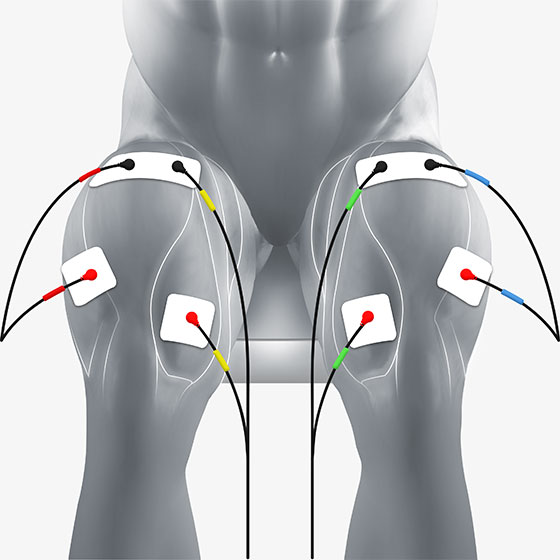
COMPEX QUAD PLACEMENT: STATIONARY WORK WEEK 1-2
- Apply the electrodes to your Quad Muscles as seen in the image. As a note, a good way to find the trigger points is to fully extend your leg and flex your quad muscle. The two budges on the side of the knee where the muscle attached are where you will place the single pads. Pull up your shorts to the top of your thigh and apply a 2x2 pad. Do this on both legs.
- Apply the black colored leads to the pad at the top of the thigh and the red colored leads to the electrodes close to the knee.
- Sit in a positon where your feet are on the ground and you are close to 90 degrees with your leg.
- Turn on your electric muscle stimulator device.
- Select the Resistance Program
- Select the Body Part (Legs)
- Deselect Warm Up
- Select Level (Week 1 lvl 1-3; Week 2-4 lvl 3-5)
- Make sure you are sitting down and Press Start
- Press the “i” button below the power button. This will allow you to level up on the channel by using any of the channel buttons.
- During the contraction, increase the level as high as it is comfortable. You will find that you can increase the level while going through the session. This is encouraged. The goal level for day 1 is 30-50.
- After the contraction you will feel a pulsing sensation, as you increase your level, increase the power during these rest periods.
- Let the program run its course until contractions have stopped (13 Minutes).
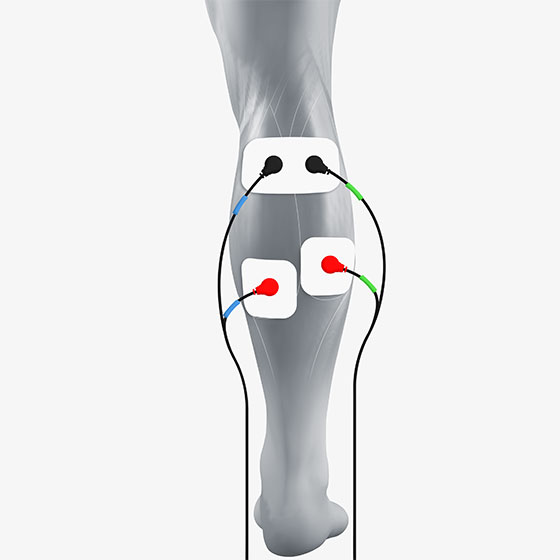
COMPEX CALVE PLACEMENT: STATIONARY WORK WEEK 1-2
- Apply the electrodes to your Calf Muscles as seen in the image. As a note, a good way to find the trigger points is to flex your calf. The bulges at the bottom of the calf muscle are where you will place the single pads. Below the back of your knee apply a 2x2 pad. Do this on both legs.
- Apply the black colored leads to the pad near the back of the knee and the red colored leads to the electrodes close to the bottom of the calf.
- Stand near a wall or with a chair to support you during this first session. For future sessions you will want a curb or a step where you can do calf raises. For the initial session, we will stay with feet to the ground until you are comfortable with the contractions.
- Turn on your electric muscle stimulator device.
- Select the Resistance Program
- Select the Body Part (Lower Legs)
- Deselect Warm Up
- Select Level (Week 1 lvl 1-3; Week 2-4 lvl 3-5)
- Press Start
- Press the “i” button below the power button. This will allow you to level up on the channel by using any of the channel buttons.
- During the contraction, increase the level as high as it is comfortable. You will find that you can increase the level while going through the session. This is encouraged. The goal level for day 1 is 30-50.
- After the contraction you will feel a pulsing sensation, as you increase your level, increase the power during these rest periods.
- Let the program run its course until contractions have stopped (13 Minutes)
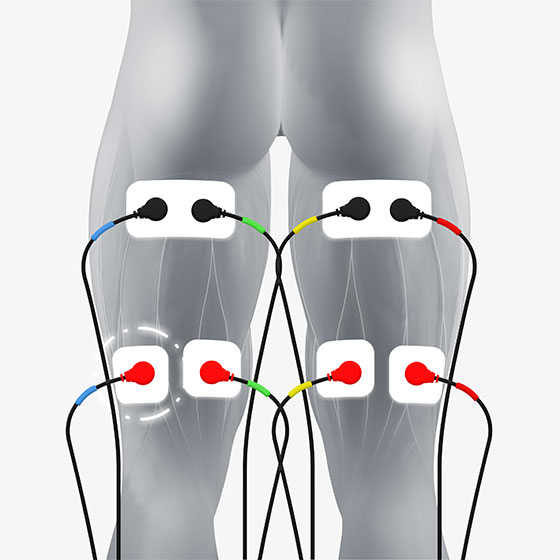
COMPEX HAMSTRING PLACEMENT: STATIONARY WORK WEEK 1-2
- Apply the electrodes to your Hamstring Muscles as seen in the image. As a note, a good way to find the trigger points is to flex your hamstring. The bulges at the bottom of the hamstring muscle (Above the back knee) are where you will place the single pads. On the upper back thigh (right below your glutes) apply a 2x2 pad. Do this on both legs.
- Apply the black colored leads to the pad below your glutes and the red colored leads to the electrodes close above the back of the knee.
- Lay stomach facing the ground, giving your legs plenty of room to stretch out.
- Turn on your electric muscle stimulator device.
- Select the Resistance Program
- Select the Body Part (Thighs)
- Deselect Warm Up
- Select Level (Week 1 lvl 1-3; Week 2-4 lvl 3-5)
- Press Start
- Press the "i" button below the power button. This will allow you to level up on the channel by using any of the channel buttons.
- During the contraction, increase the level as high as it is comfortable. You will find that you can increase the level while going through the session. This is encouraged. The goal level for day 1 is 30-50.
- After the contraction you will feel a pulsing sensation, as you increase your level, increase the power during these rest periods.
- Let the program run its course until contractions have stopped (13 Minutes)
WEEKS 2-4
Do the static exercises until you have gotten your level to above 100. The optimal level for muscle performance is between 100-300. However, you can add the following adjustments to your programming anytime you are comfortable with the technology.
WARM UP REGIMEN JUST AS YOU DID IN WEEK 1-2. Work to make these movements more stable and explosive especially in round 2-3
COMPEX QUAD PLACEMENT: DYNAMIC WORK WEEK 3-4
- Apply the electrodes to your Quad Muscles as you have done for your static placement. Follow the exact same instructions as static (Week 1-2)
- Make sure you are sitting down and Press Start
- Press the “i” button below the power button. This will allow you to level up on the channel by using any of the channel buttons. And get to a level that is slightly uncomfortable.
- Do the first 4 contractions seated. On the 4 rest session stand up. During the contraction, try to do 5 -7 Air Squats. (This is going to feel uncomfortable initially, so take your time).
- Do 4-5 sets like this. Then sit down and do the contractions seated while turning the level up each time. When seated, push your comfort level. The higher you go the better the result.
- As you progress work to do more sets of squats at higher levels. Work to do 5-10 sets of squats during contractions in each session. Some days will be harder than others. You can always do the work stationary and turn the level up as high as you can handle, but, adding the dynamic movement will help greatly in increasing your strength output.
- Let the program run its course until contractions have stopped (13 Minutes)
COMPEX CALVES PLACEMENT: DYNAMIC WORK WEEK 3-4
- Apply the electrodes to your Calve Muscles as you have done for your static placement. Follow the exact same instructions as static (Week 1-2)
- Find the curb or steps where you can do calve raises. Stand on the step with heels off the back and Press Start
- Press the “i” button below the power button. This will allow you to level up on the channel by using any of the channel buttons. And get to a level that is slightly uncomfortable.
- Do the first 4 contractions without moving. Get the strength to the right level for you. On the 5 contraction, try to do 5-7 calve raises. (This is going to feel uncomfortable initially, so take your time).
- Do 4-5 sets like this. Then do the contractions stationary while increasing the level. When stationary, push your comfort level. The higher you go the better the result.
- As you progress work to do more sets of calves raises or extensions at higher levels. Work to do 5-10 sets of raises or extensions during contractions in each session. Some days will be harder than others. You can always do the work stationary and turn the level up as high as you can handle, but, adding the dynamic movement will help greatly in increasing your strength output.
- Let the program run its course until contractions have stopped (13 Minutes)
COMPEX HAMSTRING PLACEMENT: STATIONARY WORK WEEK 3-4
- Apply the electrodes to your Hamstring Muscles as you did in weeks 1-2
- Lay stomach facing the ground, giving your legs plenty of room to stretch out.
- Turn on your device.
- Select the Resistance Program
- Select the Body Part (Thighs)
- Deselect Warm Up
- Select Level (Week 1 lvl 1-3; Week 2-4 lvl 3-5)
- Press Start
- Press the “i” button below the power button. This will allow you to level up on the channel by using any of the channel buttons.
- During the contraction, increase the level as high as it is comfortable. You will find that you can increase the level while going through the session. This is encouraged. The Goal of weeks 3-4 is to get to 100-300 strength level.
- After the contraction you will feel a pulsing sensation, as you increase your level, increase the power during these rest periods.
- Let the program run its course until contractions have stopped (13 Minutes)
GLUTES AND ABS STATIONARY WORK (Optional)
Glute Electrode Placement | Ab Electrode Placement
Compex Mode For Strength:
Resistance - Level 1-2 first 2 weeks | Level 3-5 after 2 weeksBE SURE TO TURN THE INTENSITY UP DURING CONTRACTION
Recommended Device: Compex Wireless USA 2.0 TENS
Avoid bulky wires with the Compex Wireless USA 2.0 with TENS muscle stimulator. Our Wireless USA will allow you to maximize your mobility during your workout. Turn it on. Turn it up.
